Showing posts with label ubuntu. Show all posts

Friday, November 3, 2017

Easy way to configure BIND 9 DNS server.

"I heard sometimes people need DNS" - anonymous

Now, there are two ways to configure DNS: easy way and hard way.
If you choose to do it hard, you have to dig manuals, search examples and go by trial and error, because neither of it is perfect.
OR
You can see example below. 

Example was made on Ubuntu, so on any other Linux some path may differ.

  1.  Go to /etc/bind/ and edit file named.conf.local
    add following in the end of file
    include "/srv/www/p0rc0-r0ss0.com/dns/zone.conf"
    /!\ In this example I assume, that we have virtual hosting on our server, and every website has it's own DNS zone in website folder. You can make your location as it is convenient to you. 
  2. Now go to your DNS zone folder (in my case it's /srv/www/p0rc0-r0ss0.com/dns/), and create file zone.conf
    /!\ Note, that rule allow-query restricts DNS usage to certain IP subnets.
    File should contain following:
    zone "p0rc0-r0ss0.zn" IN {
            type master;
            file "/srv/www/p0rc0-r0ss0.com/dns/p0rc0-r0ss0.zn";
            allow-query { 192.168.0.0/24; 127.0.0.1; };
            notify no;
    };

    zone "0.168.192.in-addr.arpa" IN {
            type master;
            file "/srv/www/p0rc0-r0ss0.com/dns/p0rc0-r0ss0.rzn";
            allow-query { 192.168.0.0/24; 127.0.0.1; };
            notify no;
    };
  3. Now create file p0rc0-r0ss0.zn and p0rc0-r0ss0.rzn here we place our DNS zones.
    Forward zone looks like this:$TTL 1W
    @               1D IN SOA       p0rc0-r0ss0. root.p0rc0-r0ss0. (
                                    2012090501      ; serial
                                    3H              ; refresh
                                    15M             ; retry
                                    1W              ; expiry
                                    1D )            ; minimum

                            IN A            192.168.0.254
                            1D IN NS        ns.p0rc0-r0ss0.
                            1D IN MX        10 mail.p0rc0-r0ss0.

    ns                       A               192.168.0.254
    mail                     A               192.168.0.254
    web                      A               192.168.0.254
    host1                    A               192.168.0.8
    host2                    A               192.168.0.15
  4. /!\ Notice, that you can only reverse lookup one DNS name per IP or names will be look up in round robin style, which is bad practice.
    and reverse zone is like this:

    $ORIGIN 0.168.192.in-addr.arpa.
    $TTL 1W
    ; /!\ Warning, trailing dots are mandatory!
    ;                           our domain  admin eMail
    @          1D IN SOA       p0rc0-r0ss0. root.p0rc0-r0ss0. (
                               2013080901      ; serial
                               3H              ; refresh
                               15M             ; retry
                               1W              ; expiry
                               1D )            ; minimum

                              1D IN NS        dns.p0rc0-r0ss0.

    ;IP host name
    8                       PTR             host1.p0rc0-r0ss0.
    15                      PTR             host2.p0rc0-r0ss0.
    254                     PTR             web.p0rc0-r0ss0.
Don't forget to check out /var/log/syslog for any late news ;)

Well, that's pretty much it. Of course you should remember, that if you want your DNS to work, client should use it for name resolve. This can be achieved either by setting your DNS as primary server in OS config, or by making delegation via global DNS registration company, but that's another story.

p.s.
It would be good idea to set our new DNS as primary for our server. 
Go to /etc/network/interfaces and set:
iface eno1 inet static
        address         192.168.0.250
        netmask         255.255.255.0
        gateway         192.168.0.1
        broadcast       192.168.0.255

        dns-nameservers 127.0.0.1

Sunday, June 25, 2017

Purge unnecessary locales Ubuntu

Sometimes it is annoying that ubuntu spends time generating locales we don't use, so here's the cure:

sudo locale-gen --purge


for example:
sudo locale-gen --purge en_US

will leave only US locale.

Sunday, June 4, 2017

Bulletproof samba configuration.

We all know, that sometimes it could be such a pain to get samba working. Here's configuration example that works for sure.

Let's say we want user marco to access /srv/storage and to name share stg (full url will be: ///stg )


At first you need to create system user like:
useradd -d /srv/storage -s /bin/false marco

Then we need to add this user to samba with:
smbpasswd -a marco

Now we move initial /etc/smb.conf somewhere else and fill empty one with:
/!\ WARNING! This config is bound to eno1 ethernet interface.
[global] 
# Standard config options
workgroup                    = WORKGROUP
server string                = Force is with you, young padavan!
interfaces                   = 127.0.0.0/8 eno1
bind interfaces only         = yes
log file                     = /var/log/samba/log.%m      max log size              = 1000
panic action                 = /usr/share/samba/panic-action %d
# Extra options   # AUTH
unix charset                 = UTF8
dos charset                  = 866#
domain master               = yes#
prefered master             = yes
os level                     = 77
guest account                = fj
hostname lookups             = no
netbios name                 = nvr
preserve case                = yes
short preserve case          = no
time server                  = yes
unix extensions              = no
load printers                = no
printing = bsd   printcap name = /dev/null
include = /etc/samba/stg.conf


now we should create /etc/samba/stg.conf and fill with:

[stg]
valid users             = marcocase sensitive          = auto
default case            = lower
browsable               = yes
comment                 = Everything is stashed here
create mask             = 0644
  force create mode     = 0664
directory mask          = 0775
  force directory mode  = 0775
dont descend            = /proc,/dev,/etc,/sys,/opt,/1_sys
guest ok                = no
hide dot files          = yes
hide special files      = yes
hide unreadable         = no
#hosts allow             = 192.168.1.
inherit owner           = yes
inherit permissions     = no
path                    = /srv/storage  
read only               = no
use sendfile            = yes
follow symlinks         = yes
wide links              = yes

afterwards you can type testparm and see if there are any errors. 

Babbling about "rlimit_max" is perfectly normal.

p.s. hate this crippled wysiwyg editor!

Tuesday, January 19, 2016

Installing Ubuntu on vmware Workstation.

First of all, we need vmw Workstation up and running. It's simple.


Installation

Workstation

If we have Windows 8/8.1 we'll have first VMware/windows issue with "Not enough memory to run virtual machine".
If you do realize that you have enough memory, you should go to:
C:\ProgramData\VMware\VMware Workstation


And add following string to config.ini file, it will suppress warning:
vmmon.disableHostParameters = "TRUE"


Ubuntu

Just install OS, no string attached.


Then we need install VMware-tools.


Install VMware-tools-patches from here: https://github.com/rasa/vmware-tools-patches.
in short:
$ git clone https://github.com/rasa/vmware-tools-patches.git
$ cd vmware-tools-patches
$ ./patched-open-vm-tools.sh


If above doesn't work for you see documentation. In my case I had to follow it, which didn't take much time, just:
copied VMware-tools archive into patch folder. 
$ ./untar-and-patch.sh
$ ./compile.sh


Monday, May 25, 2015

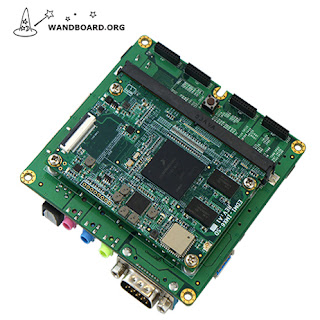
Wandboard

Wandboard DL - iMX6


Hi,
I'm a common developer who bought Wandboard (WB) Duo by accident, and now I'm trying to sort things out on "how does it works". Basically I'm creating this because I got tired of searching forum "where have I posted/seen that information", if it helps you out I see no reason why not to say thanx :)
On this page I'll try to make collection of links on "bring to life" process.
I will keep this page as informative as possible, so be advise it is NOT RECOMMENDED SKIPPING PARTS of this document. All this information is important for your board to work.

VIM cheat sheet

Basic basics :) i - start editing, current symbol a - start editing, next symbol Esc - stop editing :w - write to disk :w <filename> -...