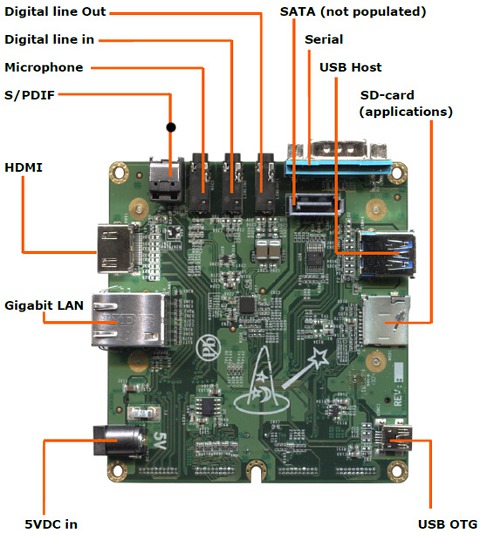
Board top
There are two boards: Motherboard (MB) and CPU board. The motherboard contains outlets to external ports so peripherals can be connected to smaller CPU board. It you change MB, you can get extended features like LVDS or VGA connectivity and likes.
IMPORTANT!
- It is highly not recommended to use wireless adapters (Wi-Fi or Bluetooth) without mounted antenna. This may lead to temporary or permanent damage of wireless chip!
- If you plan to have heavy loads on CPU I would recommend to use heat sink.
- To boot system you should use SD Card slot on CPU board (there are two, one card slot is on the left of "board top" picture, the other is on the right of "board bottom" picture, see below).
- To have normal operation board needs 5V with 2A current, I recommend using at least 4A "general purpose" adapter or it would be better to use old PC power supply (I use old 200W AT power supply, I took yellow and black wires from Molex hdd plug).
Board bottom
Bottom of the board contains plugs that are pretty self explanatory, but there are a couple of important notes. Note, that I'm describing this system as one board, but in fact it's mother board ports and slots I'm describing now.
IMPORTANT!
- There is no SATA on WB Solo or Duo. Yes, there is SATA plug, but it's no better that toy one. SATA works only on Quadro board!
- There is SECOND card slot on the bottom, it is convenient for storage extension or data copying, but it is not usabe as a boot slot (unless you have GRUB on your first SD card, but anyway, U-boot bootloader should be started from slot that is on CPU board).
Electronics
RS232/UART
IMPORTANT! If you are running Linux on your host system we recommend either kermit or cu as terminal emulation programs. Do not use minicom, since this has caused problems for many users, especially for software download over the serial port. Form U-boot manual.
During systems startup you'll need to access console and configure bootloader. This can be accomplished in following ways (I assume that /dev/ttyUSB0 is your USB-2-COM port address):
# screen /dev/ttyUSB0 115200 8N1
or (minicom is not recommended, see above)
# minicom -b 115200 D /dev/ttyUSB0
or
# microcom -p /dev/ttyUSB0 -s 115200
or if you work on windows, use PuTTY and connect to virtual serial port created by your USB-2-COM adapter (usually something above COM4), set baud rate 115200.


No comments:
Post a Comment