Monday, March 14, 2016

Network booting windows images.

Agenda

If you have linux server, and you don't have USB stick to boot PC (merry! Talking horse!) then you can boot your PC over The network.
I assume we are using Ubuntu 14.04 server. Installation on other linux distributions will be pretty much the same.
Second thing is: I'm using /tftpboot directory as workdir. 

Preparing

Faster and less crazy way

1. We need to instal isc-dhcp-server, and configure the following

host BootMeJently  {
        hardware ethernet ;
        fixed-address 192.168.0.100;
        filename "pxelinux.0";
        next-server 192.168.0.1;
        option routers 192.168.0.1;
}

Now, theese two lines can be added either to whole dynamic address pool or to single host. Whichever suits your needs better. Everything elese you can configure as usual.

2. Next we'll need tftpd-hpa package.
We should make config file at /etc/default/tftpd-hpa as follows

# /etc/default/tftpd-hpa

TFTP_USERNAME="tftp"
TFTP_DIRECTORY="/tftpboot"
TFTP_ADDRESS="0.0.0.0:69"
TFTP_OPTIONS="--secure"

Right, don't forget to restart tftp server and open UDP 69 port on your firewall (iptables in my case).

3. Now we need to install syslinux package.
Next do the following
mkdir -p /tftpboot/pxelinux.cfg
mkdir /tftpboot/win
mkdir -p /tftpboot/debian/wheezy
cd /usr/lib/syslinux 
cp menu.c32 pxelinux.0 memdisk /tftpboot
cd /tftpboot
vim /tftpboot/pxelinux.cfg/default

download debian files: initrd.gz and linux, for example from here: http://ftp.debian.org/debian/dists/wheezy/main/installer-i386/current/images/netboot/debian-installer/i386/
And put your windows iso files into win folder.

then fill /tftpboot/pxelinux.cfg/default with following:
default menu.c32
menu title PXE Network Boot Menu
prompt 0
timeout 1200

label Boot from first hard disk
localboot 0x80

############### OS DEBIAN ########
menu begin
menu title Debian

label ..
menu exit

LABEL wheezy_i386_install
kernel debian/wheezy/i386/linux
append vga=normal initrd=debian/wheezy/i386/initrd.gz  --

LABEL wheezy_i386_linux
kernel debian/wheezy/i386/linux
append vga=normal initrd=debian/wheezy/i386/initrd.gz  --

LABEL wheezy_i386_expert
kernel debian/wheezy/i386/linux
append priority=low vga=normal initrd=debian/wheezy/i386/initrd.gz  --

LABEL wheezy_i386_rescue
kernel debian/wheezy/i386/linux
append vga=normal initrd=debian/wheezy/i386/initrd.gz  rescue/enable=true --

menu end
##################################

############## OS Windows ########
menu begin
menu title Windows

label ..
menu exit

LABEL Windows10 installer
kernel memdisk
initrd win/win10.iso
append iso

LABEL WindowsXP installer
kernel memdisk
initrd win/winxpsp3.iso
append iso raw

menu end
##################################

Save everything.

Sunday, March 13, 2016

Mercedes-Benz 190 E ABS diagnostics.

Sensor resistance and voltage measure.

Sensors should have following internal resistance:
Front: 1.1 to 2.3 kOhm
Rear: 0.6 to 1.6 kOhm

Alternating Current (AC) voltage on free spinning wheel should be no less than 100mV.

Diagnostics using built in control unit.


  • Insert wire in diagnostic plug.
  • Turn on ignition without starting engine.
  • Connect wire to ground for 3 seconds.
  • ABS and ASD lights should blink error code. Count number of blinks.
  • To proceed to next code ground the wire for another 1-2 sec.
  • Read codes until codes start to repeat.
  • To erase outdated error codes connect wire to ground for 7-10 sec.


Links

http:\\merc-repair.ru/mercedes-190d/xodovaya-chast/tormoznaya-sistema/chasti-antiblokirovochnoj-sistemy-abs.html
http:\\forse.su/mercedes190/11_tormoza-mercedes190.html 

Tuesday, January 19, 2016

Installing Ubuntu on vmware Workstation.

First of all, we need vmw Workstation up and running. It's simple.


Installation

Workstation

If we have Windows 8/8.1 we'll have first VMware/windows issue with "Not enough memory to run virtual machine".
If you do realize that you have enough memory, you should go to:
C:\ProgramData\VMware\VMware Workstation


And add following string to config.ini file, it will suppress warning:
vmmon.disableHostParameters = "TRUE"


Ubuntu

Just install OS, no string attached.


Then we need install VMware-tools.


Install VMware-tools-patches from here: https://github.com/rasa/vmware-tools-patches.
in short:
$ git clone https://github.com/rasa/vmware-tools-patches.git
$ cd vmware-tools-patches
$ ./patched-open-vm-tools.sh


If above doesn't work for you see documentation. In my case I had to follow it, which didn't take much time, just:
copied VMware-tools archive into patch folder. 
$ ./untar-and-patch.sh
$ ./compile.sh


Friday, January 15, 2016

Wandboard: Software distributions.

Linaro embedded Linux distribution

Basically it's distribution that we will work with. As I figured out, there are "snapshot builds" that are made based on "slice" of current Ubuntu distribution. The idea is that engineers of linaro assemble every month new distribution, that contains all packages and fixes that released since previous distribution. That's why it's 12.04, 12.05, 12.06 unlike Ubuntu.

Currently, for WB it is good to use only distributions based on Ubuntu 12.04 (because of situation with Vivante GPU drivers, see above), which are linaro: 12.04-12.11. Next linaro release is based on Ubuntu 12.10 and can not use current GPU drivers. 

IMPORTANT! If you choose to install Nano package, be ready that you'll be forced to install everything including xorg and locales packages.

As I get it, linaro comes with minimum of country-specific options. To get locales in tune, you should define needed locales by 

# locale-def en_US
edit /etc/default/locale and add locales we defined above. Now we need just

# update-locale


Ubuntu


Ubuntu distribution


Ubuntu is pretty huge project which also covers arm architecture. Unfortunately pure Ubuntu distribution is available only for iMX53 chips (which partially explains why there is test image only for armel CPU on WB website).


headless configuration

If you want to use standard Ubuntu distribution (which comes in desktop enabled variant) without graphical user interface (GUI), then you should

echo "manual" | sudo tee -a /etc/init/lightgdm.override

special thanks to veracity for hint


Yocto


Yocto embedded linux


Yocto is not distribution, as I get it, Yocto is set of tools that help you generate linux for embeded solutions. For now I've tried out demo image from website. Well... it works. It looks like embedded system, touch-oriented. It has the same problem as Linaro/Ubuntu with Xorg resolution over HDMI-DVI (see xorg section above).

Android

Android distribution for iMX6


Android is OS developed and maintained by Google. I also tried out image from website.
  • There are no google app installed, so there is no Play Store.
  • I haven't figured out if I can use Super user privileges.
  • By default it ran 640x480 which was pretty low. There is no xorg.conf there so yet there is a problem to force change resolution.


Wandboard: Linux.

Ubuntu - Linux distribution - Unity


Click here to get back home.

Linux

There is important thing that one needs to know about ARM. There are two versions: with hardware floating point (HF) math co-processor and without (old-timers flick teardrops of their cheek remembering 286 CPUs). IMX6 CPU is based on arm v.7 architecture that has HF support, but if you use distribution compiled for HF emulation (usually has armel suffix) you loose 5-50% of processing power, because instead of working CPU emulates HF unit even though it has one.

You should choose armhf distribution form the beginning (almost all linaro distros are such).

I recommend to use WB SDK script to build kernel, for it automatically applies all the Freescale patches. Never the less, you'll need to configure and enable most patches and fixes in menuconfig. I recommend to make a copy of kernel config for further tuning.

Useful utilities

'Must have' are:
lshw - displays list of all hardware.
lsusb - displays list of all USB devices.

Xorg

IMPORTANT! Current version of GPU drivers works only with X.org 1.11.*, for now there are no vivante drivers for X.org 1.13.* and up. Thank you vivante! Since my LCD display is pretty old, it has no HDMI input on it, so I used HDMI->DVI cable to connect WB, this resulted fault in correct resolution autodetection. This problem was resolved by adding old fashion Modelines to xorg.conf. Well, I'm not sure about good of VideoRam setting, but you can safely comment it out. 

Section "Device"
 Identifier "i.MX Accelerated Framebuffer Device"
 Driver  "vivante"
 Option  "fbdev"  "/dev/fb0"
 Option  "vivante_fbdev" "/dev/fb0"
 Option  "HWcursor" "false"
 VideoRam 65536
EndSection

Section "Monitor"
 Identifier "Sony HDMI"
 VendorName "SONY"
 ModelName "MFM-HT95"
 HorizSync 28.0 - 64.0
 VertRefresh 56.0 - 76.0
 Modeline "640x480_60.00"  23.86  640 656 720 800  480 481 484 497  -HSync +Vsync
 Modeline "800x600_60.00"  38.22  800 832 912 1024  600 601 604 622  -HSync +Vsync
 Modeline "1024x768_60.00"  64.11  1024 1080 1184 1344  768 769 772 795  -HSync +Vsync
 Modeline "1280x1024_60.00"  108.88  1280 1360 1496 1712  1024 1025 1028 1060  -HSync +Vsync 
EndSection

Section "Screen"
 Identifier "Default Screen"
 Monitor  "Sony HDMI"
 Device  "i.MX Accelerated Framebuffer Device"
 DefaultDepth 24
 SubSection "Display"
  Depth  24
  Modes  "1280x1024" "1024x768" "800x600" "640x480"
 EndSubSection
EndSection

Section "ServerLayout"
 Identifier "Default Layout"
 Screen  "Default Screen"
EndSection

Vivante GPU drivers

IMPORTANT! 
The Vivante GPU driver is divided into two parts, the kernel part and the userspace part. The kernel part is found in /drivers/mxc/gpu-viv/ and is open source. While the userspace part is closed sourced, and is libGAL.so and the associated files. The open source Xorg Vivante Driver, xorg-drv-vivante, accesses the GPU through libGAL.so. 
  • To assemble the userspace part of the GPU drivers you need to unpack gpu-viv-bin-mx6q (get from freescale website),
  • You'll need to ensure that the version of the userspace part and the kernel part is the same. They'll refuse to work by leaving a message ( i.e. in Xorg log ) if their version differs. Note that there was once that the ABI interface between kernel and user space part changed, thus even if their version differs, no message will be left, it'll simply SEGFAULT Xorg.
  • Also, you should assemble and install libdrm package (the one from freescale).
  • Last but not least, HYPER MEGA important tip, the one can save you from having brain damage. if during driver assembly you get.
./configure: line 10956: syntax error near unexpected token `RANDR,'
./configure: line 10956: `XORG_DRIVER_CHECK_EXT(RANDR, randrproto)' 

error, then just install xorg-dev. Believe me, by reading this you just saved at least a couple hours (days?) of internet browsing.

Needless to say, that "auto" packages should be installed, automake and likes.
UPD. If you install Ubuntu 14.04 and higher from official website then you'll have GPU up and runnign out of the box.

fstab

On WB forum I often see "rootfs" mentioned. I haven't looked into it deeply for now, so I do everything in old fashioned way, via /etc/fstab.

It's quite simple: first of we get UUID of disks with blkid (it's done on stationary PC) and then we add to /mnt/root/etc/fstab (in terms of above example) following lines: 
UUID= / ext4 noatime,errors=remount-ro 0 1
UUID= /boot ext4 noatime               0 2
I'd recommend to use "noatime" on both drives to prolong life of SD card flash. 

network

Also I recommend to set up network right on desktop PC.

It is enough to add pretty basic lines to /etc/networking/interface 

auto eth0

iface eth0 inet dhcp

For more details on network setup please consult your favorite search engine. 

audio
Sometimes sound on wandboard needs tuning, there are several things to remember:
  • If you use image provided by wandboard.org and you are logged in as default user (usually it's ubuntu) then you should add this user to group audio.

    usermod -a -G audio ubuntu
  • To check out available devices you can issue aplay -l command.
  • You can also use alsamixer to adjust sound output levels.

It is recommended to use smplayer for accelerated video playback.

Wandboard: Initial software.

iMX6 - Linux Kernel + u-Boot bootloader


Software
Fist of all, I'd like to mention, that any action you would take will require source code. You can get it either with "wandboard-sdk" (which is preferable) or from developer's website (in this case you should patch some packages like kernel for example).

IMPORTANT! To get your system up and running you'll need to "build things", so you should first prepare your environment.

Installing compiler

Compiler is important part of build process. First that you need to understand (!) is that in your host system (the one that we will use for build) will be two compilers: standard gcc for x86_64 architecture that comes with most linux distributions and gcc for arm boards. Latter one is called cross compiler because it builds code for other architecture (i.e. resulting code can not be used on system where we build it, but needs another hardware).

This cross compiler we need to install.
# wget -c https://releases.linaro.org/14.09/components/toolchain/binaries/gcc-linaro-arm-linux-gnueabihf-4.9-2014.09_linux.tar.xz
# tar xf gcc-linaro-arm-linux-gnueabihf-4.9-2014.09_linux.tar.xz
# export CC=`pwd`/gcc-linaro-arm-linux-gnueabihf-4.9-2014.09_linux/bin/arm-linux-gnueabihf-

Getting source

Now, that we have compiler, we need to get u-boot and kernel source. To do this we will use git.
We will do all the "building" in unprivileged mode (i.e. with our user account, not root). 
let's create folders:
# mkdir ~/src

and then we just:
# git clone git://git.denx.de/u-boot.git
# cd u-boot/

# git checkout v2015.04 -b tmp

patch it:
# wget -c https://rcn-ee.com/repos/git/u-boot-patches/v2015.04/0001-wandboard-uEnv.txt-bootz-n-fixes.patc

# patch -p1 < 0001-wandboard-uEnv.txt-bootz-n-fixes.patch

and finally make it:
make ARCH=arm CROSS_COMPILE=${CC} distclean
make ARCH=arm CROSS_COMPILE=${CC} wandboard_dl_defconfig
make ARCH=arm CROSS_COMPILE=${CC}

As a result you will get u-boot.imx file, which can be installed via:
sudo dd if=./u-boot/u-boot.imx of=/dev/mmcblk0 seek=2 bs=512

Now, here's 2016 update:

You can use RNelson's netInstaller (good job, man!), which can be found here: https://github.com/RobertCNelson/netinstall.
After you clone source code it would be good idea to make temporary block device and write image to that device instead of direct SD card write. (In my case it was because VMware workstation refused to see SD card, thanks guys, great job breaking down something that works!).
Lets make 4Gb virtual disk with 1MB block size.
# create a 100M file in /opt
dd if=/dev/zero of=/opt/dev0-backstore bs=1M count=4000

# create the loopback block device 
# where 7 is the major number of loop device driver, grep loop /proc/devices
mknod /dev/fake-dev0 b 7 200 

losetup /dev/fake-dev0  /opt/dev0-backstore

SD card layout

Now, you have to be aware of iMX6 (and all u-boot) partitioning: first 512 bytes are FAT, don't touch it. Then after 1k goes u-boot with ~250kB weight. Then for some unknown reason ppl write raw kernel (which is really not what is described in wandboard.h file).
| 0-446: FAT | 447-1024: 0000000 | 1k-aprox 250k u-boot | 250k-1M: 0000000 | 1M-3M zImage |

In my case I desided to quit having headache with raw image (luckily wandboard.h file was aligned towards normal linux partitioning) and made simple structure.
/dev/sda1: boot (starts at 1MB of drive, we need to write u-boot, remember?)
/dev/sda2: root
/dev/sda3: swap
boot - contains: uEnv.txt, zImage (exaclty zImage named and packed so, unlike said above), and kernel config (just in case).
root - "/" partition.
swap - no comments.

Creating bootable SD

INFO! In this example I would not create swap partition, but you can do it if you need to.
# fdisk /dev/sdd (assuming /dev/sdd is your SDcard)
Command: n
Select: p
Partition number: 1
First sector: 2048
Last sector: +128M 
(->Now the same again, but)
Partition number: 2
First sector: (propsed, in my case it was 264192)
Last sector: (enter, to use all remaining space)
(->Enable 1-st partition to be bootable)
Command: a
Partition number: 1
(->Write everything and exit)
Command: w

cfdisk on sdd should show 1Mb of free space, then boot partition, then root partition. Now, let's create file system:
mkfs.ext4 /dev/sdd1
mkfs.ext4 /dev/sdd2

"As easy as killing bunnies with an axe" (c) Carmageddon.

Next up, mount sdd2 to /mnt/root (or whatever you wish), an sdd1 to /mnt/root/boot (this should be inside your "whatever" folder.

Now, all you have to do is to unpack contents of archive to newly mounted folder (I hope no need to tell, that you should change to source dir). This could take some time... Check the result, mine unpacked to /mnt/root/binary/boot/filesystem.dir, if so then change to that folder and do mv * ../../.. (boot folder may not move). Get rid of garbage.
# tar xvzf linaro-precise-ubuntu-desktop-20121124-560.tar.gz -C /mnt/root/
Next there will be u-boot and kernel setup (see below).

U-Boot

File uEnv.txt should be put in /mnt/root/boot folder (in this example).
Then you should write bootloader to SD card like:
dd if=u-boot.imx of=/dev/sdd bs=1k seek=1
Then you should make (or use provided, if you have such) kernel, see below.

uEnv.txt

Command quick reference

  • bootargs: The contents of this variable are passed to the Linux kernel as boot arguments (aka "command line").
  • bootcmd: This variable defines a command string that is automatically executed when the initial countdown is not interrupted.
  • bootdelay: After reset, U-Boot will wait this number of seconds before it executes the contents of the bootcmd variable. During this time a countdown is printed, which can be interrupted by pressing any key.Set this variable to 0 boot without delay.
    Be careful: depending on the contents of your bootcmd variable, this can prevent you from entering interactive commands again forever!
  • bootfile: name of the default image to load with TFTP.
  • ethaddr: Ethernet MAC address for first/only ethernet interface (= eth0 in Linux).This variable can be set only once (usually during manufacturing of the board). U-Boot refuses to delete or overwrite this variable once it has been set.
  • ipaddr: IP address; needed for tftp command
  • loadaddr: Default load address for commands like tftp or loads.
  • loads_echo: If set to 1, all characters received during a serial download (using the loads command) are echoed back. This might be needed by some terminal emulations (like cu), but may as well just take time on others.
  • mtdparts: This variable (usually defined using the mtdparts command) allows to share a common MTD partition scheme between U-Boot and the Linux kernel.
  • serverip: TFTP server IP address; needed for tftp command.
Env variables that can be set by DHCP protocol and likes
  • dnsip: IP address of your Domain Name Server
  • gatewayip: IP address of the Gateway (Router) to use
  • hostname: Target hostname
  • ipaddr: same as above
  • netmask: Subnet Mask
  • rootpath: Pathname of the root filesystem on the NFS server
  • serverip: same as above
  • filesize: Size (as hex number in bytes) of the file downloaded using the last bootp, dhcp, or tftp command. 


This is config file that has to be put to boot partition besides kernel. This file will command bootloader how to behave. Here's mine (be advised, that I'm not fan of raw_writing kernel every time, so I use "separate boot partition layout", so root is located on mmcblk0p2, see layout above).

Now, u-Boot loads two general components: zImage (or uImage) which is kernel, and dtb file. Each of this components have it's place (the address) in memory to be loaded:

  • zImage - 0x12000000
  • dtd file - 0x11000000

Netconsole

U-Boot has technology, that allows one to have WB console working over LAN. To make it work with faulty RS232 we should modify U-Boot sources, compile our own bootloader and write it to SD card. Don't worry it's not that complex.
Plan A
From u-boot folder open file include/configs/wandboard.h and add following lines:
// Define addresses:
#define CONFIG_NETMASK 255.255.255.0
#define CONFIG_IPADDR 192.168.10.99
#define CONFIG_GATEWAYIP 192.168.10.1
#define CONFIG_SERVERIP 192.168.10.100

#define CONFIG_NETCONSOLE 1
#define CONFIG_SYS_CONSOLE_IS_IN_ENV 1
Note, that 10.99 is your board IP and 10.100 is address of PC that accepts your netconsole. You can find complete pastebin of my wandboard.h here, be sure to adjust IP addresses before use!

Plan B
If you wish to have opportunity turning netconsole off, you can compile this variant of wandboard.h file and make the rest of settings with uEnv.txt file like this:
ip_dyn=no
ethaddr=
ipaddr=192.168.10.99
netmask=255.255.255.0
serverip=192.168.10.126
ncip=192.168.10.126
nc=setenv stdin nc;setenv stdout nc;setenv sterr nc
stdin=nc
stdout=nc
stderr=nc
mmcargs=setenv bootargs netconsole=6666@192.168.10.99/,@192.168.10.126/ ${optargs} root=${mmcroot} rootfstype=${mmcrootfstype}
Well, the downside of this flexible approach is that you get console output slightly later than in "Plan A", so you'll see only "booting mmc" part.

Then you should compile image as usual with "make" command, and write it to boot sector:
# dd if=u-boot.imx of=/dev/sdd bs=1k seek=1 
There are two ways to listen to netconsole. Ubuntu way is to install nc.traditional and run:
# nc.traditional -l -u -p 6666 & nc.traditional -u 192.168.10.99 6666

or you can use ncb command which is under tools folder in u-boot dir.

IMPORTANT! If at boot time WB will not find remote PC for netconsole IT WOULD NOT BOOT!

Wandboard: Overview.

Overview

Board top


There are two boards: Motherboard (MB) and CPU board. The motherboard contains outlets to external ports so peripherals can be connected to smaller CPU board. It you change MB, you can get extended features like LVDS or VGA connectivity and likes.
IMPORTANT!


  • It is highly not recommended to use wireless adapters (Wi-Fi or Bluetooth) without mounted antenna. This may lead to temporary or permanent damage of wireless chip!
  • If you plan to have heavy loads on CPU I would recommend to use heat sink.
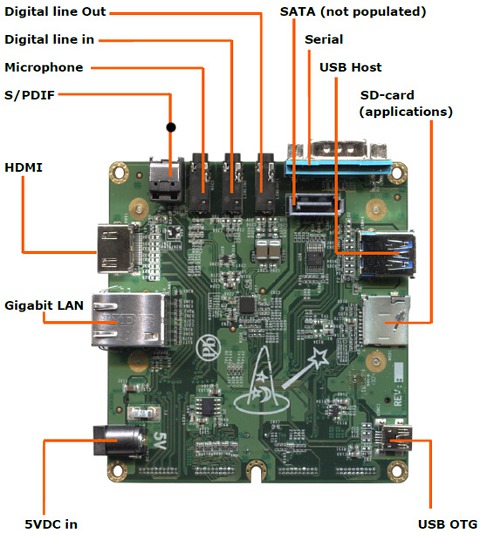
  • To boot system you should use SD Card slot on CPU board (there are two, one card slot is on the left of "board top" picture, the other is on the right of "board bottom" picture, see below).
  • To have normal operation board needs 5V with 2A current, I recommend using at least 4A "general purpose" adapter or it would be better to use old PC power supply (I use old 200W AT power supply, I took yellow and black wires from Molex hdd plug).
Wandboard DL PCB layout scheme


Board bottom


Bottom of the board contains plugs that are pretty self explanatory, but there are a couple of important notes. Note, that I'm describing this system as one board, but in fact it's mother board ports and slots I'm describing now.


IMPORTANT!
  • There is no SATA on WB Solo or Duo. Yes, there is SATA plug, but it's no better that toy one. SATA works only on Quadro board!
  • There is SECOND card slot on the bottom, it is convenient for storage extension or data copying, but it is not usabe as a boot slot (unless you have GRUB on your first SD card, but anyway, U-boot bootloader should be started from slot that is on CPU board).
Wandboard PCB layout scheme - rear side

Electronics


RS232/UART

IMPORTANT! If you are running Linux on your host system we recommend either kermit or cu as terminal emulation programs. Do not use minicom, since this has caused problems for many users, especially for software download over the serial port. Form U-boot manual.

During systems startup you'll need to access console and configure bootloader. This can be accomplished in following ways (I assume that /dev/ttyUSB0 is your USB-2-COM port address):

# screen /dev/ttyUSB0 115200 8N1

or (minicom is not recommended, see above)
# minicom -b 115200 D /dev/ttyUSB0
or
# microcom -p /dev/ttyUSB0 -s 115200
or if you work on windows, use PuTTY and connect to virtual serial port created by your USB-2-COM adapter (usually something above COM4), set baud rate 115200.


OTG

To connect OTG port you need special cable, but it's not necessarily reason to go shopping. OTG differs from regular USB with two crossed ground pins (see below).
USB OTG wiring

VIM cheat sheet

Basic basics :) i - start editing, current symbol a - start editing, next symbol Esc - stop editing :w - write to disk :w <filename> -...